Intro
Welcome to the chorus.js tutorials!
This is intended for people familiar with computer music production and basic computer programming, but you can get by knowing just one if you are determined.
If you haven't already, install chorus.js and follow the Quick Start Guide.
Chorus.js doesn't generate music directly (yet). Instead, you'll write JavaScript code that outputs MIDI, a standard format for music. The MIDI output can be converted to actual music by a huge variety of MIDI-compatible software and hardware. The Quick Start Guide showed a simple way to produce actual music, which admittedly was poor quality. The second half of this tutorial explains how to connect to professional-grade music production software (optional).
A Chorus.js program needs to do two things:
- Define a song
- Play that song with an output
Defining Songs
Let's break down the Quick Start example.
After loading the chorus module (line 2), we use its Song class to construct a song instance (lines 5-11):
// quick-start.js
const { Song, Output } = require('chorus');
require('chorus/names').into(global);

const song = new Song({
  sections: [{
    parts: [{
      pitches: [C4, D4, E4, F4, G4, F4, E4, D4, C4],
    }]
  }]
});

Output.select().then(output => output.play(song));
A song is a list of sections that are played sequentially. Each section is a list of parts that are played simultaneously. For example, a verse can be represented by a section, and each instrument by a part. This will be explored in detail in the Song Structure tutorial.
The simplest Part is just a list of pitches (line 8).
The names C4, D4, E4, F4, G4, are pitch constants that were loaded on line 3.
Because no rhythm was given, each pitch plays for 1 beat by default.
We'll learn a lot more about Pitch and Rhythm in the next few tutorials.
Selecting Outputs
After defining a song, the Quick Start example chooses an Output and plays the song on line 13.
When Output.select() is called, several things can happen depending on how
you ran the code:
Output a MIDI file named
file.mid:node quick-start.js -f file.midOutput real-time MIDI to the virtual MIDI port named
virtual1:node quick-start.js -p virtual1Same as above (output real-time MIDI to virtual port
virtual1), but specify the port with an environment variable:CHORUS_OUTPUT_PORT=virtual1 node quick-start.jsNOTE: the -p command line argument overrides this environment variable
List all real-time MIDI ports and select one interactively (or type ctrl+C to exit):
node quick-start.js
When specifying the real-time MIDI output port via any of these options,
a case-insensitive substring match is used. So -p virt and -p tual1 would both match the port virtual1. If a single port matches,
Output.select() resolves a promise with an output instance for that port.
Otherwise, you'll be prompted to interactively select a port.
When Output.select's promise resolves with an output instance, simply call output.play(song) and chorus.js handles the rest.
Timing Accuracy
It is currently not possible to get rock-solid timing accuracy in JavaScript. This means the real-time MIDI output is subject to timing jitter (notes may randomly play late by several milliseconds). I have found it to be "good enough" for preview purposes while designing a song in chorus.js.
Once you are happy with your song, output as a MIDI file for perfect timing accuracy. Then drag and drop the MIDI file into your music production app.
Alternately, clean up a real-time MIDI recording with quantization, the standard "timing snap" function found in most music production software.
Virtual MIDI Ports
NOTE: The rest of this tutorial is optional and intended for DAW / synthesizer app users. Feel free to skip ahead to the Pitch tutorial.
To connect chorus.js to another application, first we need to create a "virtual MIDI port" that can be used to send MIDI messages between applications.
macOS
Open the built-in
Audio MIDI Setupapplication (under/Applications/Utilities)Go to the
MIDI Studiowindow (menu:Window -> Show MIDI Studio)Double click
IAC Driverto open theIAC Driver PropertieswindowMake sure
Device is onlineis checkedClick
More informationto expand theIAC Driver PropertieswindowClick
+to add a port and name it whatever you want.
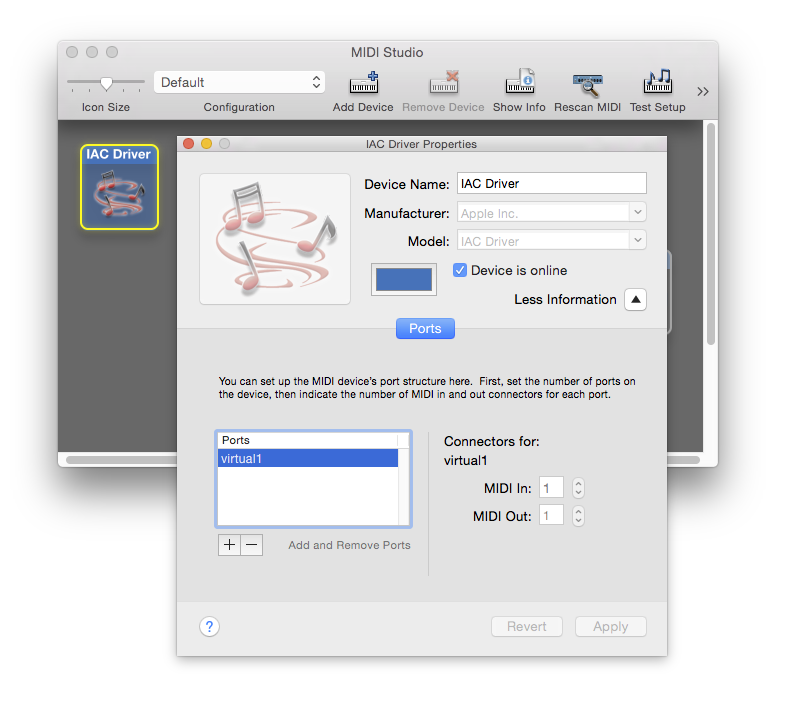
In this screen shot, I named my MIDI port virtual1. Now I can send chorus.js MIDI over this port by running:
node quick-start.js -p virtual1Windows
Install loopMIDI
Run loopMIDI and click
+to add a virtual MIDI port
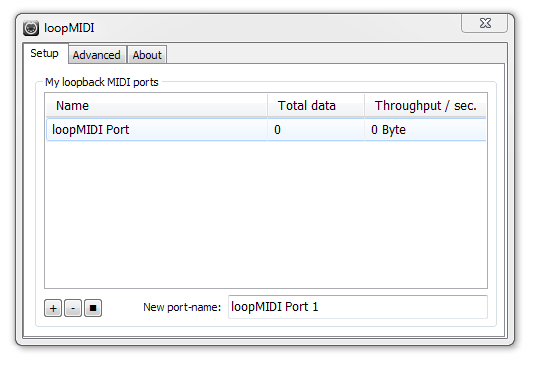
In this screen shot, I named my MIDI port loopMIDI. Now I can send chorus.js MIDI over this port by running:
node quick-start.js -p loopmidiLinux
I'm not sure because I don't have a music-capable Linux machine to test with. It can work, in theory.
Try the JACK Audio Connection Kit
Know how to improve these instructions? Send a pull request on github.
DAW Setup
Now that we have a virtual MIDI port, we can receive chorus.js MIDI in a DAW, such as Ableton Live.
Most DAWs listen to all MIDI inputs by default, so chorus.js should work without any additional setup. For example, here's the default MIDI track settings in Ableton Live:

If we hit record on this track and run chorus.js using our virtual MIDI port, we'll receive and record the MIDI in our DAW.
This default setup may not work for you if:
- You want to use multi-track MIDI output from chorus.js to control multiple tracks / instruments simultaneously
- You want to jam along with chorus.js using a physical instrument like a MIDI keyboard or MIDI guitar
In those cases, you'll need to route the MIDI to different tracks by setting specific input ports and channels.
For example, here I've setup three tracks Ableton Live to listen to chorus.js over the virtual1 MIDI port using channels
1, 2, and 3:
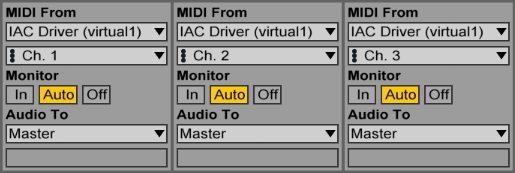
By default, each part in a chorus.js song section outputs on consecutive MIDI channels. So the first part outputs on channel 1, the second on channel 2, and so on (more on this in Song Structure tutorial).
If you are working with multi-track MIDI, don't forget to arm all your tracks for recording.
Each DAW is different, so consult your DAW's manual if you aren't sure how to setup your MIDI tracks. NOTE: Bitwig Studio is unusual and requires Tom's Bitwig Scripts to be installed to do multi-track MIDI recording. Most other DAWs should be straightforward to setup.
Next Steps
Next is the Pitch tutorial.